
This tutorial is my own design and any resemblance to any other tutorial is purely coincidental. It was created in Paint Shop Pro X © April 2020 - Yvonne - Yorkshire Lass Designs - All rights reserved. You will need the following to complete this tutorial: Masks creation.tine_masque080.jpg creation.tine_masque171.jpg (from Espace Tine - Masks) Other Supplies kjb-tromance-theworldoftromance24_colorel.psp ann_bird6.psp marguerite VSP.pspimage PatryTubes_06_objects_01.psp tubtatie_457furhe.png yp-decor-strip.psp yp-for-sale-sign.pspimage yp-pattern-plaid.jpg yp-text-a-charming-victorian.pspimage yp-trees-and-fence.pspimage.pspimage All the supplies can be downloaded here Download and extract supplies to a file on your computer then open in PSP and minimise Plugins Xero - Porcelain The above can be downloaded HERE Download and extract to your Plugins folder ********** Drag this arrow with you to mark your place in the tutorial 
********** STEP 1 Open a new canvas 800 x 600 pixels transparent 
STEP 2 In the Materials Palette load Foreground with #58200D BROWN and Background with #FFFFFF WHITE Flood fill layer with Foreground colour #58200D BROWN STEP 3 Layers >> New Raster Layer Flood fill this layer with Background colour #FFFFFF WHITE STEP 4 Layers >> New Mask Layer >> From Image Select creation.tine_masque.080.jpg from the drop down list Invert Mask Data UNCHECKED 
Layers >> Merge >> Merge Group Image >> Mirror STEP 5 Layers >> New Raster Layer Flood fill this layer with Background colour #FFFFFF WHITE Layers >> New Mask Layer >> From Image Select creation.tine_masque171.jpg from the drop down list Invert Mask Data UNCHECKED 
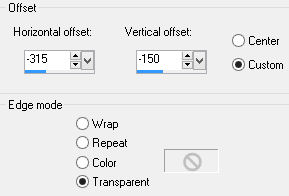
Layers >> Merge >> Merge Group STEP 6 Maximise kjb-tromance-theworldoftromance24_colorel.psp tube Edit >> Copy Minimise original Edit >> Paste as New Layer Image >> Resize 80% Resize All Layers UNCHECKED Effects >> Image Effects >> Offset 
STEP 7 Maximise yp-trees-and-fence.pspimage Edit >> Copy Minimise original Edit >> Paste as New Layer Effects >> Image Effects >> Offset 
Layer >> Properties Reduce OPACITY to 38 
STEP 8 Maximise margeurite VSP.pspimage Edit >> Copy Minimise original Edit >> Paste as New Layer Image >> Resize 15% Resize All Layers UNCHECKED With the MOVE TOOL position flowers beneath tree as shown below 
Layers >> Duplicate Image >> Resize 60% Resize All Layers UNCHECKED With the MOVE TOOL position flowers beneath tree as shown below 
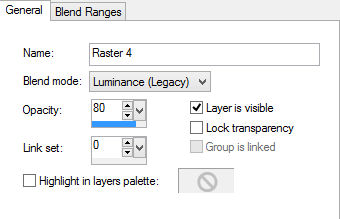
Layers >> Merge >> Merge Down Adjust >> Sharpness >> Sharpen Layer >> Properties Change BLEND MODE to Luminance Legacy and OPACITY to 80 
STEP 9 Maximise yp-decor-strip.psp Edit >> Copy Minimise original Edit >> Paste as New Layer Effects >> Image Effect >> Offset 
Layers >> Duplicate Image >> Flip Effects >> Image Effects >> Offset 
Layers >> Merge >> Merge Down STEP 9 Layers >> New Raster Layer Selection Tool >> Custom Selection 
Flood fill selection with Background colour #FFFFFF WHITE Selections >> Select None Layers >> Merge >> Merge Down STEP 10 Effects >> 3D Effects >> Drop Shadow 
Repeat Drop Shadow changing VERTICAL and HORIONTAL offsets to minus 2 (-2) STEP 11 Layers >> New Raster Layer In the Materials Palette, change Foreground Style to PATTERN Select yp-pattern-plaid.jpg from the options Angle = 45, Scale = 75 
Selection Tool >> Custom Selection 
Flood fill selection with Foreground pattern Selections >> Select None Layers >> Merge >> Merge Down THIS IS WHAT YOU SHOULD HAVE NOW 
STEP 12 In the Materials Palette, change Foreground Style to COLOR Load Foreground with #A9B191 GREEN Select the Pen Tool with the following settings: Top line: Start node at X=1, y=500, end node at x=799, y=500 Click APPLY Bottom line: Start node at x=1, y=545, end node at x=799, y=545 Click APPLY 
Layers >> Convert to Raster Layers >> Merge >> Merge Down STEP 13 Maximise yp-for-sale-sign.pspimage Edit >> Copy Minimise original Edit >> Paste as New Layer Image >> Resize 80% Resize All layers UNCHECKED STEP 14 Maximise ann_bird6.psp Edit >> Copy Minimise original Edit >> Paste as New Layer Image >> Resize 80% Resize All layers UNCHECKED Select the Move Tool and place birds on top of sign Layers >> Merge >> Merge Down 
Image >> Resize 30% Resize All layers UNCHECKED Effects >> Image Effects >> Offset 
Adjust >> Sharpness >> Sharpen Effects >> 3D Effects >> Drop Shadow 
Layers >> Arrange >> Move Down Layers >> Properties Reduce OPACITY of this layer to 80% 
STEP 15 Maximise tubtatie Windows >> Duplicate Remove tuber's mark Edit >> Copy Edit >> Paste as New Layer Layers >> Arrange >> Bring to Top Effects >> Image Effects >> offset 
Effects >> 3D Effects >> Drop Shadow 
STEP 16 Maximise PatryTubes_06_Objects_01.psp In the Layer Palette, highlight Copy of Layer 2 Edit >> Copy Minimise original Edit >> Paste as New Layer Image >> Free Rotate 
Effects >> Image Effects >> Offset 
Effects >> 3D Effects >> Drop Shadow 
Repeat Drop Shadow changing VERTICAL and HORIZONTAL offsets to minus 2 (-2) STEP 17 Layers >> New Raster Layer Add your name and/or watermark STEP 18 Layers >> Merge >> Merge Visible Effects >> Plugins >> Xero >> Porcelain 
STEP 19 Image >> Add Borders 
STEP 20 Layers >> Promote background layer Image >> Canvas Size 
STEP 21 Layers >> New Raster Layer In the Materials Palette change Foreground Style to PATTERN Flood Fill layer with plaid pattern Effects >> Plugins >> Xero >> Porcelain 
Layers >> Arrange >> Move Down STEP 22 In the Layers Palette, highlight Raster 1 (the top layer) Selection Tool Custom Selection 
Layers >> New Raster Layer Maximise yp-text-a-charming-victorian.pspimage Edit >> Copy Minimise original Edit >> Paste into Selection Selections >> Select None Effects >> 3D Effects >> Drop Shadow 
STEP 22 Image >> Add Borders 
Resize if desired Save as a jpg and we're done. I hope you enjoyed this tutorial! If you have any questions or would just like to show me your result EMAIL ME VERSIONS FROM MY TRANSLATORS Thank you Peggy, Hannogirls-Tutorials-Kiste (Germany) 
BACK TO TUTORIALS - PAGE 4 |