

This tutorial is my own design and any resemblance to any other tutorial is purely coincidental. It was created in Paint Shop Pro X and Animation Shop 3.1 © May 2018 - Yvonne - Yorkshire Lass Designs - All rights reserved. You will need the following to complete this tutorial: cuba-3207576_640.png suitcase-160345_640.png suitcase-2665254_640.png suitcase-924605_640.png (Street and suitcase vector images from Pixabay) yp-girlfriends-group-selfie.pspimage yp-text-girls-on-tour3.pspimage The above can be downloaded here Download and extract to a file on your computer Open in PSP and minimise Plugins I.C.NET Software Filters Unlimited 2.0 >> Edges, Square 17 The above can be downloaded HERE Download and extract to your Plugins folder *********** Drag this arrow with you to mark your place in the tutorial Drag and Drop Script from Dynamic Drive 
********** INSTRUCTIONS STEP 1 Open a new canvas 800 x 600 transparent background 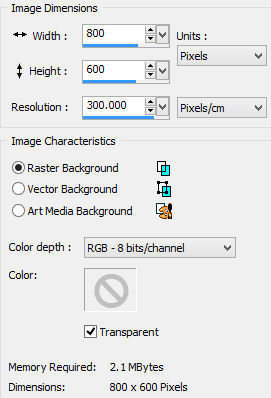
STEP 2 In the Materials Palette load Foreground with #B81064 MAGENTA and Background with #FFFFFF WHITE Fill layer with Foreground colour #B80164 MAGENTA STEP 3 Layers >> New Raster Layer Fill layer with Background colour #FFFFFF WHITE Image >> Resize 99% Resize all layers UNCHECKED STEP 4 Layers >> New Raster Layer Selections >> Select All Maximise cuba-3207576_640.jpg Edit >> Copy Minimise original Edit >> Paste into Selection Image >> Resize 90% Resize all layers UNCHECKED Selections >> Select None In the Layers Palette reduce opacity to 50% Layers >> Properties 
Effects >> Edge Effects >> Enhance Effects >> Plugins >> I.C.NET Software >> Filters Unlimited 2.0 >> Edges, Square >> Square Edge 17 Use Background Color UNCHECKED STEP 5 Maximise suitcase-160345_640.png Edit >> Copy Minimise original Edit >> Paste into Selection Image Resize 25% Resize all layers UNCHECKED Effects >> Image Effects >> Offset 
Adjust >> Sharpness >> Sharpen Effects >> 3D Effects >> Drop Shadow 
STEP 6 Maximise suitcase-2665254_640.png Edit >> Copy Minimise original Edit >> Paste as New Layer Image >> Resize 25% Resize all layers UNCHECKED Effects >> Image Effects >> Offset 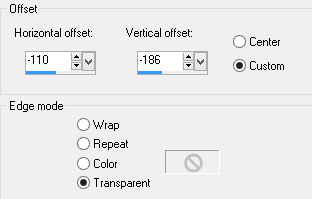
Adjust >> Sharpness >> Sharpen Effects >> 3D Effects >> Drop Shadow 
STEP 7 Maximise suitcase-924605_640.png Edit >> Copy Minimise original Edit >> Paste as New Layer Image >> Resize 20% Resize all layers UNCHECKED Effects >> Image Effects >> Offset 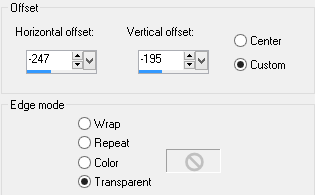
Adjust >> Sharpness >> Sharpen Effects >> 3D Effects >> Drop Shadow 
STEP 8 suitcase-924605_640.png should still be on the clipboard Edit >> Paste as New Layer Image >> Resize 25% Resize all layers UNCHECKED Image >> Mirror Effects >> Image Effects >> Offset 
Adjust >> Sharpness >> Sharpen Effects >> 3D Effects >> Drop Shadow 
STEP 9 Maximise yp-text-girls-on-tour3.pspimage Edit >> Copy Minimise original Edit >> Paste as New Layer Effects >> Image Effects >> Offset 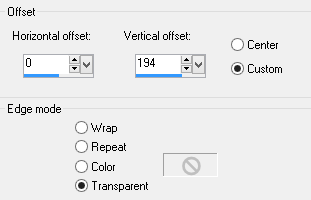
Effects >> 3D Effects >> Drop Shadow 
STEP 10 Maximise yp-girlfriends-group-selfie.png Edit >> Copy Minimise >> Original Edit >> Paste as New Layer Remove tuber's information Effects >> Image Effects >> Offset 
Effects >> 3D Effects >> Drop Shadow 
STEP 11 Layers >> Duplicate Working on the copy of Raster 9 Effects >> Illumination Effects >> Sunburst 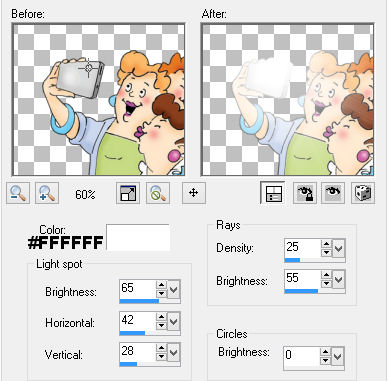
STEP 12 Layers >> New Raster Layer Add your name and/or watermark NOW TO ANIMATE STEP 13 In the Layers Palette hide Copy of Raster 9 
Edit >> Copy Merged STEP 14 Open Animation Shop Edit >> Paste as New Animation Return to Paint Shop Pro STEP 15 In the Layers Palette make Copy of Raster 9 visible and hide Raster 9 
Edit >> Copy Merged STEP 16 Return to Animation Shop Edit >> Paste >> After Current Frame Stay in Animation Shop STEP 17 Select Frame 1 (F:1) Animation >> Frame Properties Change the display time to 250 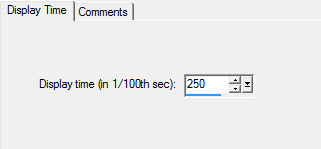
STEP 18 Select Frame 2 (F:2) Animation >> Frame Properties Change the display time to 20 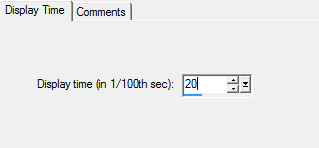
This is what you should have now 
STEP 19 Resize Animation if desired I saved mine to 700 x 525 pixels Animation >> Resize Annimation 
STEP 19 View >> Animation If you're happy with it, save as a gif File >> Save As When the "Save As" dialogue box opens, fill in the details and save as a gif For the next 3 dialogue boxes click NEXT On the final dialogue box click FINISH I hope you enjoyed this tutorial. If you have any questions or would like to show me your result EMAIL ME Return to PSP Tutorials - Page 4 |