
|

This tutorial is my own design and any resemblance to any other tutorial is purely coincidental. It was created in Paint Shop Pro 8 © February 2009 - Yvonne - Yorkshire Lass Designs - All rights reserved ~ Revised January 2013 - Paint Shop Pro X ~ SUPPLIES WS1-Anime_RedRose060109.psp from Willeke's Tubes WSL_Mask249.jpg from Weescotslass Creations The tube and mask can be downloaded HERE Download and extract to a file on your computer then open tube and mask in PSP and minimise FTU Scrap Kit "Twilight" from VixPSP Wordart "Love Lost" also from VixPSP Under Vix's Terms of Use I am unable to supply the Scrap Kit or Wordart in the supplies. They can be downloaded here VixPSP On the home page scroll down to the Blog Archive list on the right-hand side. The Wordart can be found under 2009 - February and the Scrap Kit can be found under 2008 - November Download and extract wordart to a file on your computer then open PSP and minimise Extract scrap kit to your desk top or where you can find it easily *********** Drag this arrow with you to mark your place in the tutorial Drag and Drop Script from Dynamic Drive ********** INSTRUCTIONS STEP 1 Open a new canvas 700 x 700 white background 
Layers >> Promote Background Layer STEP 2 Layer >> New Raster Layer Selections >> Select All STEP 3 Open Vix_TwilightPaper10. Edit >> Copy Minimise Paper Edit >> Paste into Selection Selections >> Select None STEP 4 Layers >> New Mask Layer >> From Image Select WSL_Mask 249 from the dropdown list Source luminance checked 
Layers >> Merge >> Merge Group STEP 5 Open Vix_TwilightFrame1 Edit >> Copy Minimise frame Edit >> Paste as New Layer Image >> Resize 85% Resize All Layers unchecked Adjust >> Sharpness >> Sharpen STEP 6 Effects >> 3D Effects >> Drop Shadow 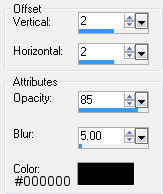
Repeat Drop Shadow changing Vertical and Horizontal Offsets to minus 2 (-2) STEP 7 Maximise tube WS1-Anime_RedRose060109.psp Edit >> Copy Edit >> Paste as New Layer Image >> Rotate >> Free Rotate 
Select the Move Tool and position tube so that the bottom edge of the tube meets the edge of the red frame. See finished image for placement Apply Drop Shadow same settings as in STEP 6 STEP 8 Open Vix_TwilightGemTrail Edit >> Copy Edit >>Paste as a New Layer Layers >> Duplicate Image >> mirror Layers >> Merge >> Merge down Layers >> Arrange >> Move Down The gem trail layer should now be beneath the tube layer STEP 9 In the Layers Palette highlight the top layer (Raster 3) STEP 10 Open Vix_TwilightButterfly Edit >> Copy Edit >> Paste as New Layer Image >> Resize 40% Resize all layers unchecked Adjust >> Sharpness >> Sharpen Layers >> duplicate three times Image >> Mirror Move the four butterflies into position. See finished tag for placement Add drop shadow (same settings as in STEP 6) to each of the butterflies STEP 11 In the Layers Palette highlight the top layer (Copy(3) of Raster 5) STEP 12 Open Vix_LoveLostWordart Select Forget in the layer palette 
Edit >> Copy Minimise Wordart Edit >> Paste as New Layer Image >> Rotate >> Free Rotate 
Select the Move Tool and position wordart at the bottom of the tag See finished image for placement STEP 13 In the Materials Palette load foreground with Red #76151E Layers >> New Raster Layer Selections >> Select All Selections >> Modify >> Contract Number of Pixels 3 Selection >> Invert Flood fill selection with foreground colour Red #76151E Image >> Resize 98% Resize All layers unchecked Do not de-select STEP 14 Flood fill selection with foreground color Red #76151E Selections >> Select none STEP 15 Layers >> New Raster Layer Add your name and/or watermark STEP 16 Layers >> Merge >> Merge All (Flatten) Resize if desired and save as a jpg I hope you enjoyed this tutorial! If you have any questions or would like to show me your result EMAIL ME Return to Tutorials - Page 2 |