
|
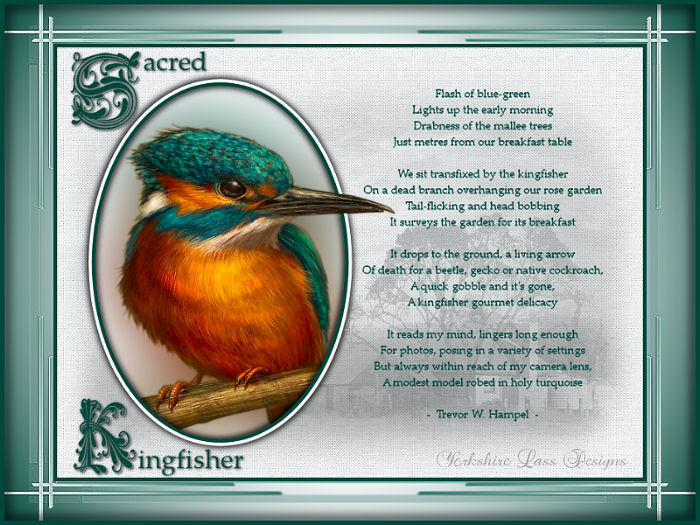
This tutorial is my own design and any resemblance to any other tutorial is purely coincidental. It was created in Paint Shop Pro X. © February 2014 - Yvonne - Yorkshire Lass Designs - All rights reserved. You will need the following to complete this tutorial: Image59TheFisher_LR.pspimage anna.br_por-do-sol_15-08-10.psp ZuzzMask115.jpg from Zuzanna's Mask yp_old_australia_homestead_misted.pspimage yp-sacred-kingfisher-poem.psp yp_sacred-text.psp yp_kingfisher-text.psp All the above can be downloaded here Download and extract to a file on your computer Open tubes, text and mask in PSP and minimise Extract fonts to your Fonts folder. Open then minimse. Plugins I.C.Net Software - Filters Unlimited 2.0 - Paper Textures - Canvas,Fine Available here http://www.lesdouceursdecloclo.com/mesfiltres/mes_filtres.htm Download and extract to your Plugins folder *********** Drag this arrow with you to mark your place in the tutorial Drag and Drop Script from Dynamic Drive 
********** INSTRUCTIONS STEP 1 Open a new canvas 800 x 600 transparent background 
STEP 2 In the Materials Palette load Foreground with Mint #F3F6F6 and Background with Dark Green #00473C Select Flood Fill Tool and fill canvas with foreground colour #F8F5F7 STEP 3 Layers >> Duplicate Effects >> Plugins >> I.C.Net Software >> Filters Unlimited 2.0 
STEP 4 Layers >> New Raster Layer Selections >> Select All Maximise tube anna.br_por-do-sol_15-08-10.psp Edit >> Copy Minimise tube Edit >> Paste into Selection Selections >> Select None Image >> Mirror In the Layer Palette change Blend Mode to Luminance (Legacy) and reduce opacity to 24 Layers >> Properties 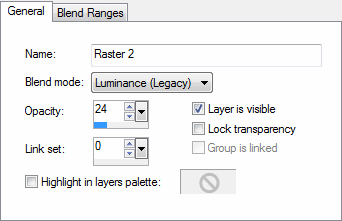
Layers >> Merge >> Merge Down STEP 5 Layers >> New Raster Layer Select Selection Tool >> Custom Selection 
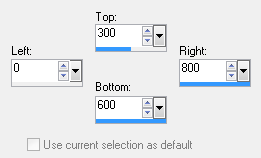
Maximise tube yp_old_australian_homestead_misted.pspimage Edit >> Copy Minimise tube Edit >> Paste into Selection Selections >> Select None Image >> Mirror In the Layer Palette change Blend Mode to Luminance (Legacy) and reduce opacity to 40 Layers >> Properties 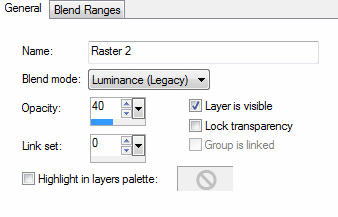
Effects >> Edge Effects >> Enhance Layers >> Merge >> Merge Down STEP 6 Select the Preset Shape Tool and select Ellipse from the drop down list with the following settings 

Place cursor at the co-ordinates x=400, y=50 and keeping the left mouse button depressed move the cursor to the left and down until the following co-ordinates appear Layers >> Convert to Raster Layer STEP 7 Selection Tool >> Magic Wand 
Click on the green ellipse Selections >> Modify >> Contract Number of pixels 5 Edit >> Clear Do not de-select STEP 8 In the Layer Palette highlight Copy of Raster 1 Edit >> Clear Selections >> Select None STEP 9 In the Layer Palette highlight Raster 1 (bottom layer) Maximise tube Image59The Fisher_LR.pspimage Edit >> Copy Minimise tube Edit >> Paste as New Layer Effects >> Image Effects >> Offset 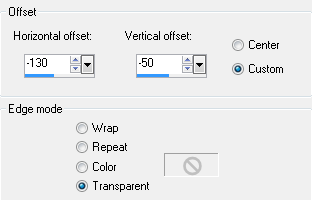
Adjust >> Blur >> Gaussian Blur Radius = 50 STEP 10 In the Layer Palette highlight Copy of Raster 1 The bird tube should still be on your clipboard Edit >> Paste as New Layer Effects >> Image Effects >> Offset Same settings as in STEP 9 STEP 11 Selection Tool >> Freehand Selection 
Zoom in and select the two areas as shown below 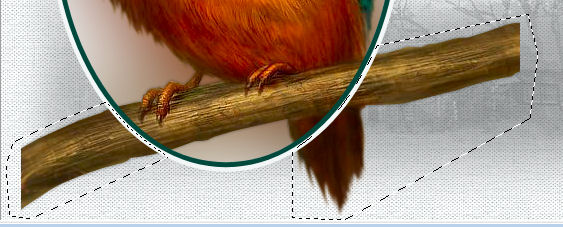
Edit >> Clear Selections >> Select None STEP 12 In the Layer Palette highlight Raster 2 (the top layer) Zoom in and select the part of the oval frame as shown below 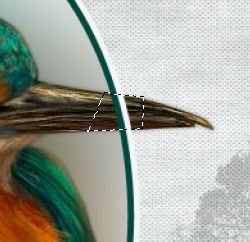
Edit >> Clear Selections >> Select None Effects >> 3D Effects >> Drop Shadow 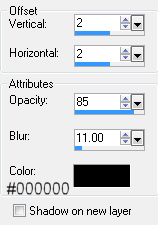
Repeat Drop Shadow changing Vertical and Horizontal Offsets to minus 2 (-2) STEP 13 Maximise yp_sacred_kingfisher_poem.psp Edit >> Copy Minimise original Edit >> Paste as New Layer Effects >> Image Effects >> Offset 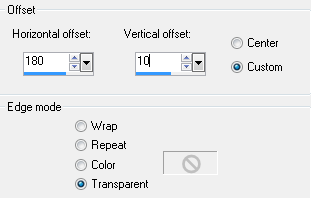
Layers >> Duplicate Layers >> Merge Down STEP 14 Maximise yp_sacred-text.psp Edit >> Copy Minimise original Edit >> Paste as New Layer Effects >> Image Effects >> Offset 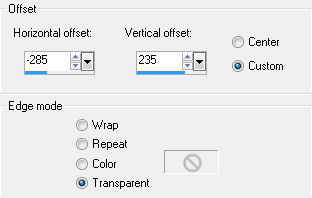
STEP 15 Maximise yp_kingfisher-text.psp Edit >> Copy Minimise original Edit >> Paste as New Layer Effects >> Image Effects >> Offset 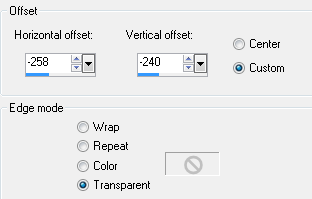
Layers >> Merge Down Effects >> 3D Effects >> Drop Shadow 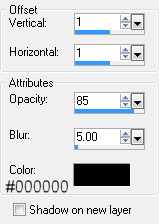
STEP 16 Layers >> New Raster Layer Selections >> Select All Selections >> Modify >> Contract Number of pixels 5 Selections >> Invert Select Flood Fill Tool and fill selection with Background colour Dark Green #00473C Selections >> Select None STEP 17 Layers >> Merge >> Merge Visible Resize image to 678 x 500 pixels Resize all layers and Lock aspect ratio unchecked Image >> Resize 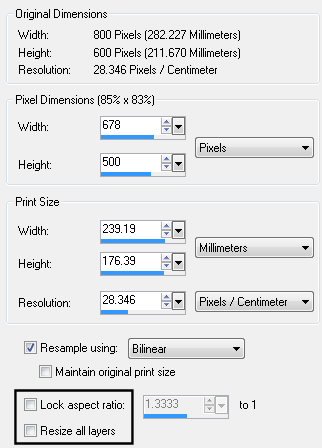
Adjust >> Sharpness >> Sharpen STEP 18 In the Materials Palette change Foreground style to Gradient 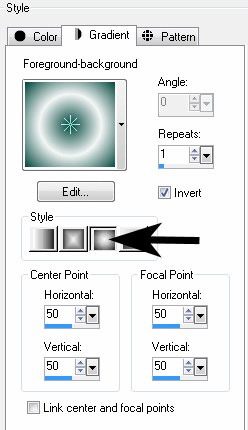
Layers >> New Raster Layer Select Flood Fill Tool and fill layer with gradient STEP 19 Layers >> New Raster Layer Fill layer with gradient this time with Invert unchecked 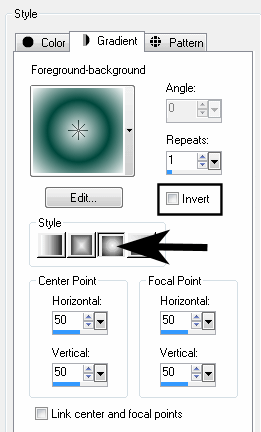
Layers >> New Mask layer >> From Image Select ZuzzMask115.jpg from the drop down list 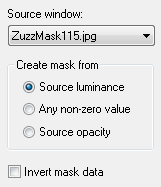
Layers >> Merge >> Merge Group Effects >> Edge Effects >> Enhance STEP 20 Layers >> Merge >> Merge Down Layers >> Arrange >> Send to Bottom STEP 21 Layers >> New Raster Layer Selections >> Select All Selections >> Modify >> Contract Number of pixels 5 Selections >> Invert Select Flood Fill Tool and fill selection with Background colour Dark Green #00473C Selections >> Select None STEP 22 Effects >> 3D Effects >> Drop Shadow 
Repeat Drop Shadow changing Vertical and Horizontal Offsets to minus 2 (-2) STEP 23 Layers >> New Raster Layer Add your name and/or watermark Layers >> Merge >> Merge All (Flatten) Resize if desired Save as a jpg I hope you enjoyed this tutorial. If you have any questions or would like to show me your result EMAIL ME Return to Tutorials - Page 3 |