|
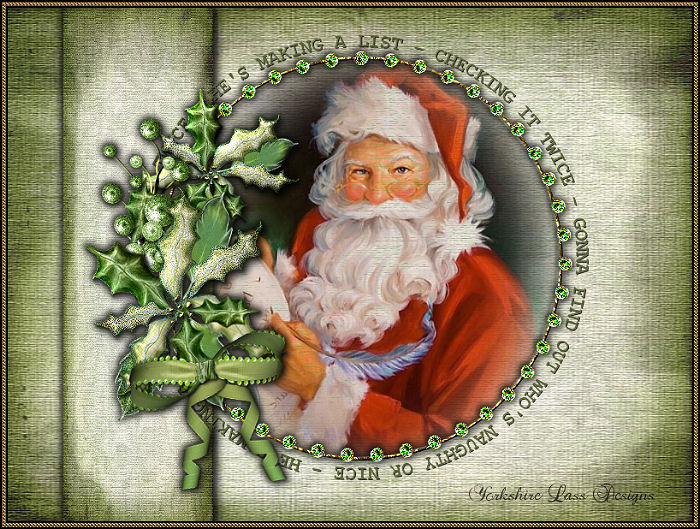
SANTA'S LIST
This tutorial is my own design and any resemblance to any other tutorial is purely coincidental.
© 2013 Yorkshire Lass Designs in PSP. All Rights Reserved.
It was created in Paint Shop Pro X, but can be realised in other versions.
However, some tool descriptions and locations may vary, but the overall result
should be the same.
My thanks to all the artists and other creators, known and unknown to me,
who have
inspired this tutorial and whose work I have used.
You will need the following to complete this tutorial:
TUBESTINNADNOEL2008(15).psp
yp_santaslist-wordart.psp
goldbeads.jpg
SL-GreenPoinsettiaSabreFrame.png
SL-PoinsettiaPaper1.jpg
from "Green Poinsettia" Scrap kit by Sabre (Scrap Kit included in supplies)
http://sabresquilandparchment.blogspot.com (link inactive)
All the above can be downloaded here

Download and extract to a file on your computer
Open in PSP and minimise
***********
Drag this arrow with you to mark your place in the tutorial
Drag and Drop Script from Dynamic Drive

**********
INSTRUCTIONS
STEP 1
Open a new canvas 800 x 600 transparent background

STEP 2
Selections >> Select All
STEP 3
Open paper SL-PoinsettiaPaper1.jpg
Edit >> Copy
Minimise original
Edit >> Paste into Selection
Selections >> Select None
STEP 4
Layer >> New Raster Layer
Selection Tool >> Selection >> Custom Selection

SL-PoinsettiaPaper1.jpg should still be on the clipboard
Edit >> Paste into Selection
Selections >> Select None
STEP 5
Effects >> 3D Effects >> Drop Shadow
Repeat Drop Shadow changing Vertical and Horizontal Offsets to minus 2 (-2)
STEP 6
Maximise tube SL-GreenPoinsettiaSabreFrame.png
Edit >> Copy
Minimise tube
Edit >> Paste as New Layer
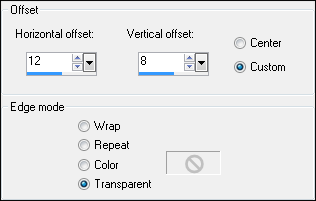
Effects >> Image Effects >> Offset
Apply Drop Shadow as in STEP 5
STEP 7
Maximise tube TUBESTINNADNOEL2008(15).psp
Edit >> Copy
Minimise tube
Edit >> Paste as a New Layer
Image >> Resize 110%
Resize all layers unchecked
Image >> Mirror
Effects >> Image Effects >> Offset

In the Layer Palette change Blend Mode to Darken
Layer >> Properties
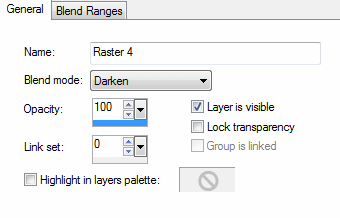
Layers >> Arrange >> Move Down
STEP 8
With the Selection Tool >> Freehand Selection

Make sure Raster 4 is still highlighted in the layer palette
Zoom in and select around the inside of the ring of the poinsettia frame

Selections >> Invert
Edit >> Clear
Selections >> None
STEP 9
Maximise tube yp_santaslist-wordart.psp
Edit >> Copy
Minimise tube
Edit >> Paste as New Layer
Effects >> Image Effects >> Offset
Word art layer should be under the frame layer
STEP 10
Layers >> New Raster Layer
Add your name and/or watermark
STEP 11
Layers >> Merge >> Merge All (Flatten
STEP 12
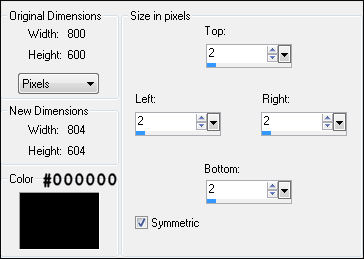
Image >> Add Borders
STEP 13
Image >> Add Borders
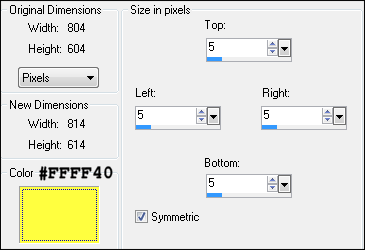
With the Magic Wand select the yellow border

In the Materials Palette change Style to Pattern and select goldbead.jpg from the drop-down options
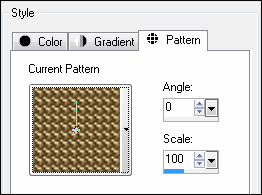
Fill selected border with pattern
STEP 14
Image >> Add Borders
STEP 15
Resize if desired
Save as a jpg
I hope you enjoyed this tutorial.
If you have any questions or would like to show me your result
EMAIL ME
|