|
SUMMER MEMORIES

This tutorial is my own design and any resemblance to any other tutorial is purely coincidental.
© 2016 Yorkshire Lass Designs in PSP. All Rights Reserved.
It was created in Paint Shop Pro X, but can be realised in other versions.
However, some tool descriptions and locations may vary, but the overall result
should be the same.
My thanks to all the artists and other creators, known and unknown to me,
who have
inspired this tutorial and whose work I have used.
You will need the following to complete this tutorial:
jcw_buds.psp
Misted_vanishing_Dunes_RM.psp
Misted_Ocean_Scene_RM.psp
sg_tattered-pictures.Pspmask (from Essex Girl)
YLD-summer-memories-sel.PspSelection
yp-text-summer.pspimage
yp-text-memories.pspimage
The above can be downloaded here

Download and extract to a file on your computer.
Place selection in your PSP Files/Selections folder.
Open all other supplies in PSP and minimise
Plugins
MuRa's Meister - cloud
Available here
http://www.lesdouceursdecloclo.com/mesfiltres/mes_filtres.htm
Download and extract to your Plugins folder
***********
Drag this arrow with you to mark your place in the tutorial

**********
INSTRUCTIONS
STEP 1
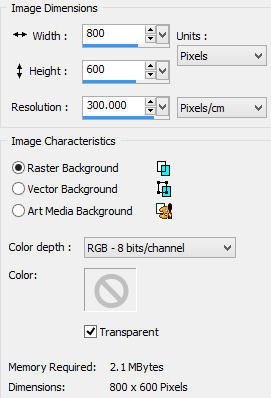
Open a new canvas 800 x 600 transparent background
STEP 2
Maximise tube Misted_Ocean_Scene_RM.psp
Edit >> Copy
Minimise original
Edit >> Paste as New Layer
Image resize 55%
Resize All Layers UNCHECKED
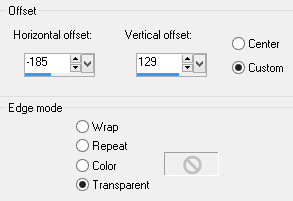
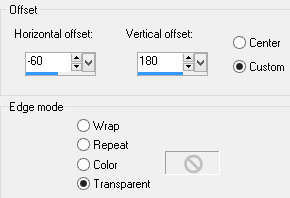
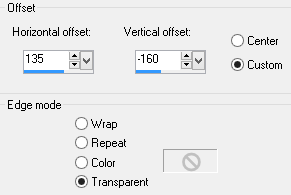
Effects >> Image Effects >> Offset
STEP 3
Maximise tube Misted_Vanishing_Dunes_RM.psp
Edit >> Copy
Minimise original
Edit >> Paste as New Layer
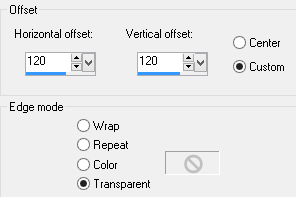
Effects >> Image Effects >> Offset
Layers >> Merge >> Merge Down
STEP 4
Maximise tube jcw_buds.psp
Edit >> Copy
Minimise original
Edit >> Paste as New Layer
Image >> Mirror
Image >> Resize 160%
Resize All Layers UNCHECKED
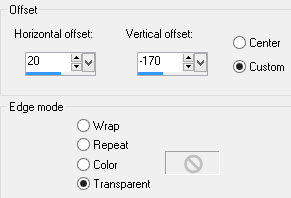
Effects >> Image Effects >> Offset
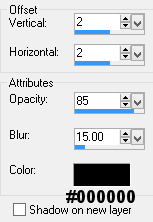
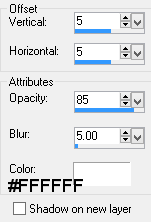
Effects >> 3D Effects >> Drop Shadow
Layers >> Merge >> Merge Down
STEP 5
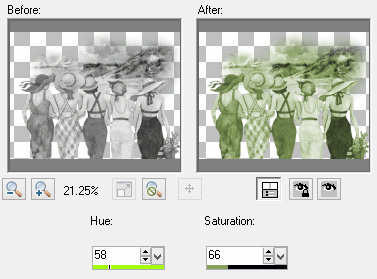
Image >> Greyscale
Adjust >> Hue and Saturation >> Colorize
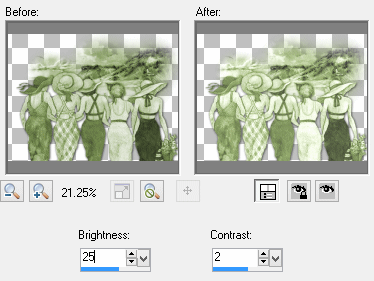
Adjust >> Brightness and Contrast >> Brightness/Contrast
STEP 6
In the Materials Palette load
Foreground with #FEFFEE Cream and Background with #697D4A Dark Green
STEP 7
In the Layers Palette highlight the bottom layer (Raster 1)

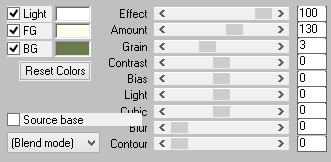
Effects >> Plugins >> MuRa's Meister >> Cloud
STEP 8
Layers >> New Raster Layer
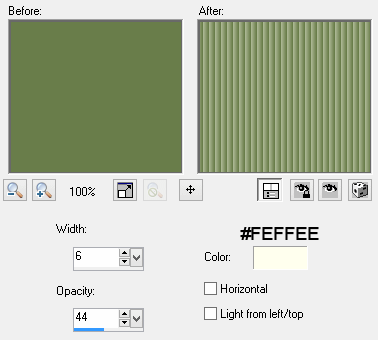
Select Flood Fill Tool and fill layer with Background Colour #697D4A Dark Green
Effects >> Texture Effects >> Blinds
Layers >> Arrange >> Bring to Top
STEP 9
Selections >> Load/Save Selection >> Load Selection from Disk
Select YLD-summer-memories-sel from the dropdown options
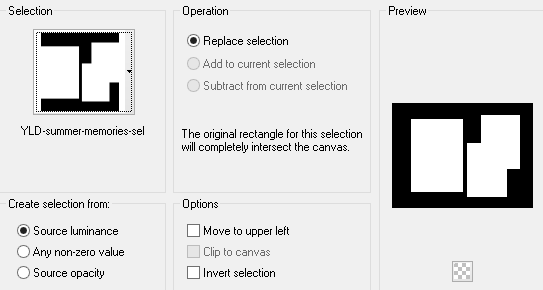
Edit >> Clear
Selections >> Select None
STEP 10
Layers >> New Raster Layer
Select Flood Fill Tool and fill layer with Foreground Colour #FEFFEE Cream
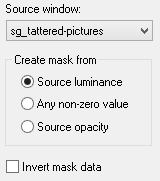
Layers >> New Mask Layer >> From Image
Select sg_tattered-pictures from the dropdown options
Layers >> Merge >> Merge Group
Layers >> Duplicate
Effects >> Edge Effects >> Enhance More
STEP 11
Maximise text yp-text-summer.pspimage
Edit >> Copy
Minimise original
Edit >> Paste as New Layer
Effects >> Image Effects >> Offset
Effects >> 3D Effects >> Drop Shadow
STEP 12
Maximise text yp-text-memories.pspimage
Edit >> Copy
Minimise original
Edit >> Paste as New Layer
Effects >> Image Effects >> Offset
Effects >> 3D Effects >> Drop Shadow
STEP 13
Layers >> New Raster Layer
Add your name and/or watermark
Layers >> Merge >> Merge All (Flatten)
STEP 14
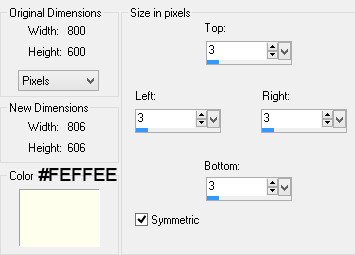
Image >> Add Borders
STEP 15
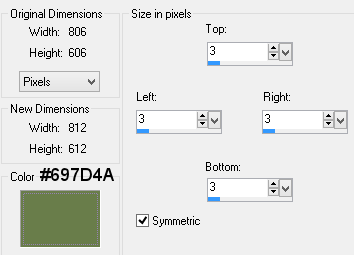
Image >> Add Borders
STEP 16
Resize image if desired
Save as a jpg
I hope you enjoyed this tutorial.
If you have any questions or would like to show me your result
EMAIL ME
|