
|
This tutorial is my own design and any resemblance to any other tutorial is purely coincidental. It was created in Paint Shop Pro V8. © Yvonne - Yorkshire Lass Designs - September 2009 - All Rights Reserved. ~ Revised March 2012 ~ You will need the following to complete this tutorial: Tubes A Mercurial Mind - Tubed by Jack.psp yp_alice_misted.psp corner.pspimage yp_mad_hatter_wordart.psp The above can be downloaded here Extract to a file on your computer, then open all tubes in PSP and minimise ********** Drag this arrow with you to mark your place in the tutorial ********** STEP 1 Open a new canvas 650 x 450 white In the Materials Palette Set your Foreground to Beige #DFD2BF and your Background to Dark Brown #221B11 Change your Foreground to Gradient with the following settings Style = Sunburst/Invert CHECKED 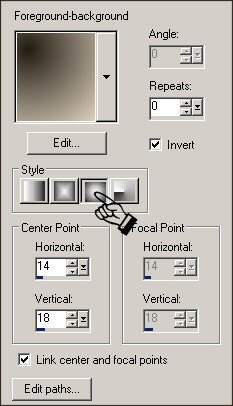
Flood fill canvas with Gradient STEP 2 Maximise yp_alice_misted.psp Edit >> Copy Minimise tube Edit >> Paste >> Paste as New Layer Image >> Resize 85% Resize all Layers unchecked In the layers palette change the Blend Mode to Luminance (Legacy) Layers >> Merge >> Merge Visible Image >> Resize 85% Resize All Layers unchecked STEP 3 Layers >> New Raster Layer Flood fill with Gradient but with Invert UNCHECKED Layers >> Arrange >> Send to Bottom Layers >> Merge >> Merge Visible Image >> Resize 85% Resize all layers unchecked STEP 4 Layers >> New Raster Layer Flood fill with Gradient but with Invert CHECKED Layers >> Arrange >> Send to bottom Layers >> Merge >> Merge Visible Image >> Resize 85% Resize All layers unchecked STEP 5 Layers >> New Raster Layer Flood fill with Gradient but with Invert UNCHECKED Layers >> Arrange >> Send to bottom STEP 6 The tube yp_alice_misted.psp should still be on your clipboard Edit >> Paste >> Paste as New Layer Layers >> Arrange >> Bring to Top Image >> resize 85% Resize all layers unchecked In the layer palette change the Blend Mode to Luminance (Legacy) Adjust >> Sharpness >> Sharpen With the Move Tool position tube to the right. This is what you should have now 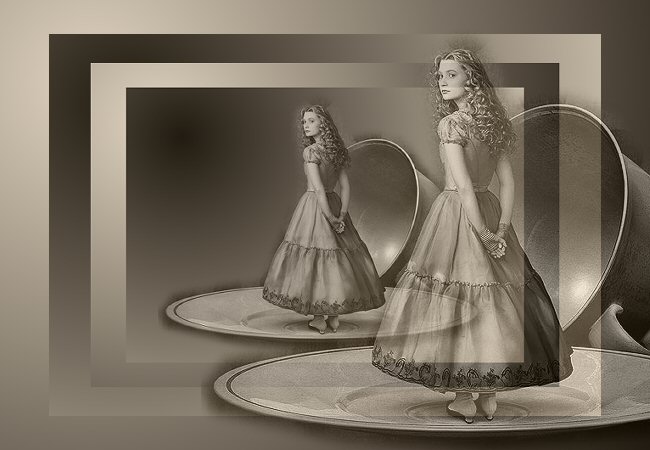
STEP 7 Maximise A Mercurial Mind - Tubed by Jack.psp Edit >> Copy Minimise tube Edit >> Paste >> Paste as New Layer Image >> Mirror Image >> Resize 60% Resize all layers unchecked Adjust >> Sharpness >> Sharpen Effects >> Edge Effects >> Enhance With Move Tool position on the left Effects >> 3D Effects >> Drop Shadow  Repeat Drop Shadow changing the Vertical and Horizontal Offsets to minus 2 (-2) This is what you should have now 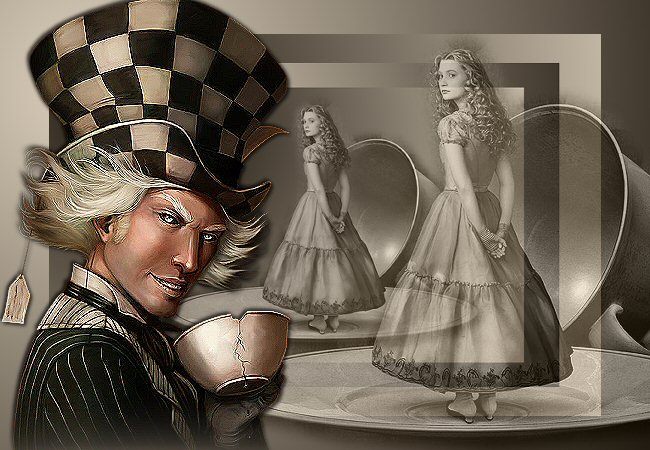
STEP 8 Layers >> Merge >> Merge Visible Image >> Resize 85% Resize all layers unchecked Adjust >> Sharpness >> Sharpen Layers >> New Raster Layer Flood fill with Gradient but with Invert CHECKED Layers >> Arrange >> Send to Bottom STEP 9 In the layers palette select the Merged layer Effects >> 3D Effects >> Drop Shadow
Repeat Drop Shadow changing the Vertical and Horizontal Offsets to minus 2 (-2) STEP 10 Maximise corner.pspimage Edit >> Copy Minimise tube Edit >> Paste >> Paste as New Layer Image >> Resize 85% Resize all layers unchecked Adjust >> Sharpness >> Sharpen Move to the top right corner (see finished image for placement) In the layer palette change Blend Mode to Luminance (Legacy) Layers >> Duplicate Image >> Flip STEP 11 In the layer palette select Raster 2 Effects >> 3D Effects >> Drop Shadow
STEP 12 In the layer palette select Copy of Raster 2 Edit >> Repeat Drop Shadow STEP 13 Maximise yp_mad_hatter_Wordart.psp Edit >> Copy Minimise tube Edit >> Paste >> Paste as New Layer Image >> Rotate >> Free Rotate >> Left 90 degrees, All layers unchecked Move to the left. See finished image for placement Adjust >> Sharpness >> Sharpen Effects >> 3D Effects >> Drop Shadow Repeat Drop Shadow changing the Vertical and Horizontal Offsets to minus 2 (-2) Layers >> Merge >> Merge All (Flatten) STEP14 Image >> Add Borders 
STEP 15 Add your name and/or watermark Resize if desired. Save as a jpg and we're done. I hope you enjoyed this tutorial! If you have any questions or would just like to show me your result EMAIL ME BACK TO TUTORIALS - PAGE 1 |